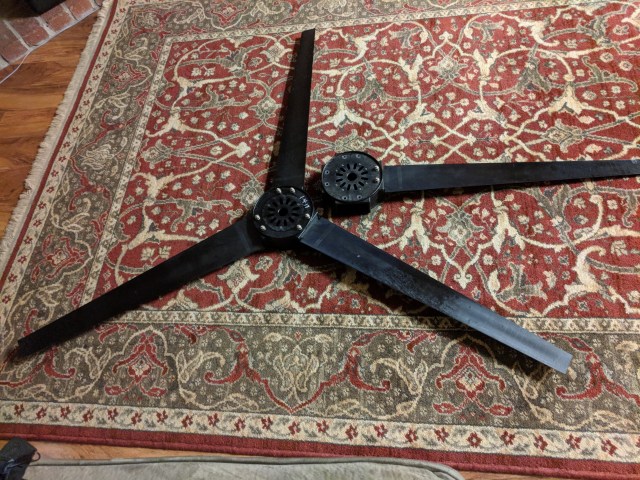
4 Minus 1 Equals 3

Last week when I was talking to the owner of Jay Bird Engines, the maker of my P3 Lite’s engine, they mentioned that they don’t really have data on 4 bladed props matched up with their engines.  All the engines they shipped out for Six Chuter P3 Lites were matched up with three bladed props.  So I called Ultra Props, the maker of my propeller and ordered a three blade hub.   My blades would fit into it as the hubs are universally machined for any number of blades and blade angles.  It arrived today and I installed three of the blades from my four bladed hub into the three blade hub. I used the 12 degree spacers as this is what Jay Bird indicated I should use.  It’s now mounted on the engine and waiting for a test run and flight this weekend if the weather holds.

IMG_20171128_185305.jpg

Thanksgiving Day Multimedia Extravaganza

Had a great Thanksgiving today.  It started with a drive out to New Jerusalem airport to do some flying.  I’ve been worried about high engine cylinder head temperatures so I bought a new digital CHT gauge.  I installed it out at the airport and did a test engine run.  I put the digital gauge on the rear cylinder thinking that this would be the hotter cylinder… not so!  You see, on my engine, a Kawasaki A440, there is a cooling fan on the engine.  It is oriented facing forward.  I had always assumed that the airflow would be through the front of the engine and out the rear.  But I forgot one thing… my engine is mounted facing backwards.  So the cooling air coming through the engine flows against the relative wind created as I fly.  I’ll have to check with J-Bird, the manufacturer of my engine to see if that is how all their other engines are set up.  This could explain my elevated cylinder head temps.

Now, all that being said, oddly enough, my temps were solidly in the low to normal range today!  So I’m going to go back the the next smaller high jet on my carburetor and see if the temps stay down.  Not sure why they suddenly dropped today.  My wife may be onto something when she quipped, “Maybe it’s finally done breaking in.”  Could be.

Here’s a short video of today’s flight.

After an epic Thanksgiving dinner with my kids and a nap, I retired to the garage to adjust the fan belt tension.  Yes, the aforementioned cooling fan has a belt that needs to be tightened after the first 3 hours of operation.  Some folks never tighten their belts but I decided to go by the book.  Probably because this engine has burnt it’s rings twice.  Tightening the belt involves removing one half of the belt pulley, removing a shim, and then reassembling the two pulley halves.  That is much easier said than done.  Here is a video describing the belt tightening ordeal.

After tightening the belt I did a quick engine run to make sure the belt was still tight and all checked out.  All ready for the next flight!

Good News!

In my previous blog entry I wrote about my engine woes.  I sent the photos to Rolando Santiago at Six Chuter who took a look and informed me the piston was toast.  He and Doug Maas consulted with J-Bird Engines (the engine manufacturer).  J-Bird asked for the engine to be sent to them so they could take a look.  To their credit, the guys as Six Chuter paid the cost to ship the engine back!  Once the engine arrived, the guys at J-Bird knew exactly what happened.

You see, there are exactly two belts on this engine.  Both of them are fan belts… more or less.  One belt is on the rear of the engine and connects the crankshaft to the propeller.  It reduces the RPM of the propeller because the prop isn’t designed to turn at 6500 RPM.  The other fan belt turns an actual cooling fan at the front of the engine.  Now there are sections in the engine manual that describe tightening these belts.  I dutifully checked the belt tension on the prop, but missed the huge page in the manual saying how important it is to adjust the tension on the fan belt!

When J-Bird dug into the engine the first thing they noticed was how loose the fanbelt was on the cooling fan.  And yep, the front piston was in the worst shape.  Problem found.  The engine was overheating due to poor cooling.  Totally my fault.  But here is where the AMAZING customer service part of the story comes in.  I was told the engine would be rebuilt at NO COST to me whatsoever.

Now, gentle reader, I don’t know how much you know about aircraft companies but Six Chuter is an anomaly in aviation.  Most aircraft companies would have said “Uh, user error, you need to pay the cost to fix your engine.”  Six Chuter did not do this because they believe in their products.  They stand behind their products and the components that go into their products.  Six Chuter is run by people of integrity and truly believe they are held accountable to God for everything they do on this earth and it shows.  I cannot say enough about this company.

So back to the engine.  They are going to rebuilt it from the crankshaft up and it should hopefully be shipped back to me next week.  I’ll post more updates on the re-install and next steps on the engine when I get it back.

Morning P3 Test Flights

I’ve been doing lots of tweaks and testing of my engine on the ground but haven’t flown it much.  I changed that this past Friday and Saturday mornings.  Friday morning I flew with the 10 degree prop blocks.  These set the propeller pitch to 10 degrees.  I found that throttle response was good but because of the fine pitch of the prop climb rate was reduced and I found myself at almost 6000 RPM just to maintain level flight.  That only gave me a couple of hundred RPM more to climb with.  Not a good feeling.  Also the engine cylinder head temperatures were running too high at 400 degrees.  Even worse feeling.  However throttle response and smoothness were much improved as was exhaust gas temperature.

Friday night after work I put the 11 degree prop blocks in.  I test flew these Saturday morning.  In all honesty I didn’t notice much difference in the way of climb performance but CHT was lower which was good and EGT was also lower which is very good.  I did notice a little ‘bogging down’ of the throttle in one particular RPM range but it wasn’t too bad.

For next week’s test flight have have moved the carburetor jet needle to the number 2 position.  This will make it run slightly leaner which may cause EGT to rise.  I’ll have to watch that.

Because there are so many parameters to change it’s all started getting mixed up in my head.  To that end I’ve started a spreadsheet to track and measure all my changes.  I should have done this in the beginning.  I’ll put the link below in case anyone is interested.

https://docs.google.com/spreadsheets/d/1X_E330q6iU6X_8-54gjdI0Xuz_Gk5UPr6Od_Bf1Eomk/edit?usp=sharing

I’m also going to take a page from one of the blogs I follow.  He always leaves a song linked to the end of his blog.  I like the idea.  So cruise on into your Sunday evening with the smooth sounds of Tom Middleton…

I Think We’re About There

So the last two weeks there has been little in the way of flying and a lot in the way of carburetor tuning.  We’ve been tweaking jet needle settings and even replacing jet needles but the one change that seems to have worked wonders is repitching the prop.   Six Chuter sent me two more sets of prop blocks to repitch my prop.

The blocks are basically triangular blocks of carbon fiber, similar in appears to a door stop – sort of shaped like a right triangle.  The long edge is precisely set at a particular angle.  You wedge the prop between two of these blocks and then place it in the propeller hub and that sets your blade angle.

The current spacers I have are set at 12 degrees.  I tried the 11 degree blocks but that didn’t seem to make any difference.  When I put the 10 degree blocks in I got much better RPMs and cooler temperatures, so much so that I put my original jet needle back in and back at it’s original setting.  I’ll try a test flight on Saturday morning and we’ll see how it it works out.

P3 Lite Status Udate

Here’s just a quick video with a status update on my P3 Lite Powered Parachute from Six Chuter.  Still enjoying this little beast.  Have worked out a couple bugs and have just one more to go.  Great little machine!

And Even More Flying

After a REALLY hectic week at work it was great to unwind out at New Jerusalem flying with my buddy Joey.  He’s actually the one that suggested I try PPC rather than PPG.  Joey was already set up and ready to go by the time I got out there.  The air was calm and cool.  Joey launched and I finished getting my PPC ready to go.  I bucked in, fired up my engine and 100 feet later I was climbing into the air.

We flew out over the river but it got a little bumpy that direction.   We were probably hitting a little wind shear since the wind was starting to slowly pick up.  I turned south and my ground speed went from 17 MPH to 42 MPH.  I messed around checking my throttle response (I had adjusted the carb earlier in the week).

I flew back to the airport and could see that the wind was picking up.  At this stage in my PPC flying I elected to go ahead and land and call it a day.  After packing up I ran into a group of balloonists.  As luck would have it they had been taking pictures of Joey and I.  So I will leave with with some of the pictures they took.


Flying

Not much to say this week.  I did install a larger fuel tank on the Swamp Plane.  (I’ve taken to calling it a Swamp Plane because people have asked if it’s a swamp boat or swamp buggy).  This video is from a test flight after installing the new fuel tank.  Enjoy!