Well as I reported in my blog entry about our trip to Morgan Hill RV Resort, we developed a leak in the hot water valve fitting on our outdoor shower. I ordered some tools to remove and replace the valve but I, being who I am, could not wait for the tools to arrive so I improvised.
I used a cutoff wheel in my Dremmel grinder to remove the existing stainless steel crimp ring that secures the tubing to the plastic elbow.
90 Degree elbow, crimping ring, and PEX tubing
I had to be pretty careful so as not to nick or melt the tubing so it was pretty slow going but I finally got the crimp ring off and got the fitting out.
Plastic elbow fitting connects the hot water line to the outdoor shower valve
I stopped off at Lowe’s RV supply department (that’s a joke y’all) and picked up some PEX tubing in case I really blew this and the next closest fitting I could find which was made of brass.
Since I didn’t have the ring crimping tool or any replacement crimp rings I made do with a hose clamp from my airplane supply box. I put it all back together and no leaks! I’ll keep my eye on it though. The tool and crimp rings did finally show up so I can always do the repair properly in the future if I elect to.
Installed brass fitting and hose clamp kludge-a-ma-jig.
I could have just taken it back to the dealer to have it repaired but it would have taken weeks to get it back. Since we’re not under warranty any longer I can imagine the bill would be a couple hundred bucks. This way I saved money and didn’t have to be without our trailer. You can save a lot of money on your RV if you learn to be handy with some tools and use what you have on hand. It’s the difference between an adventure and a cancelled trip.
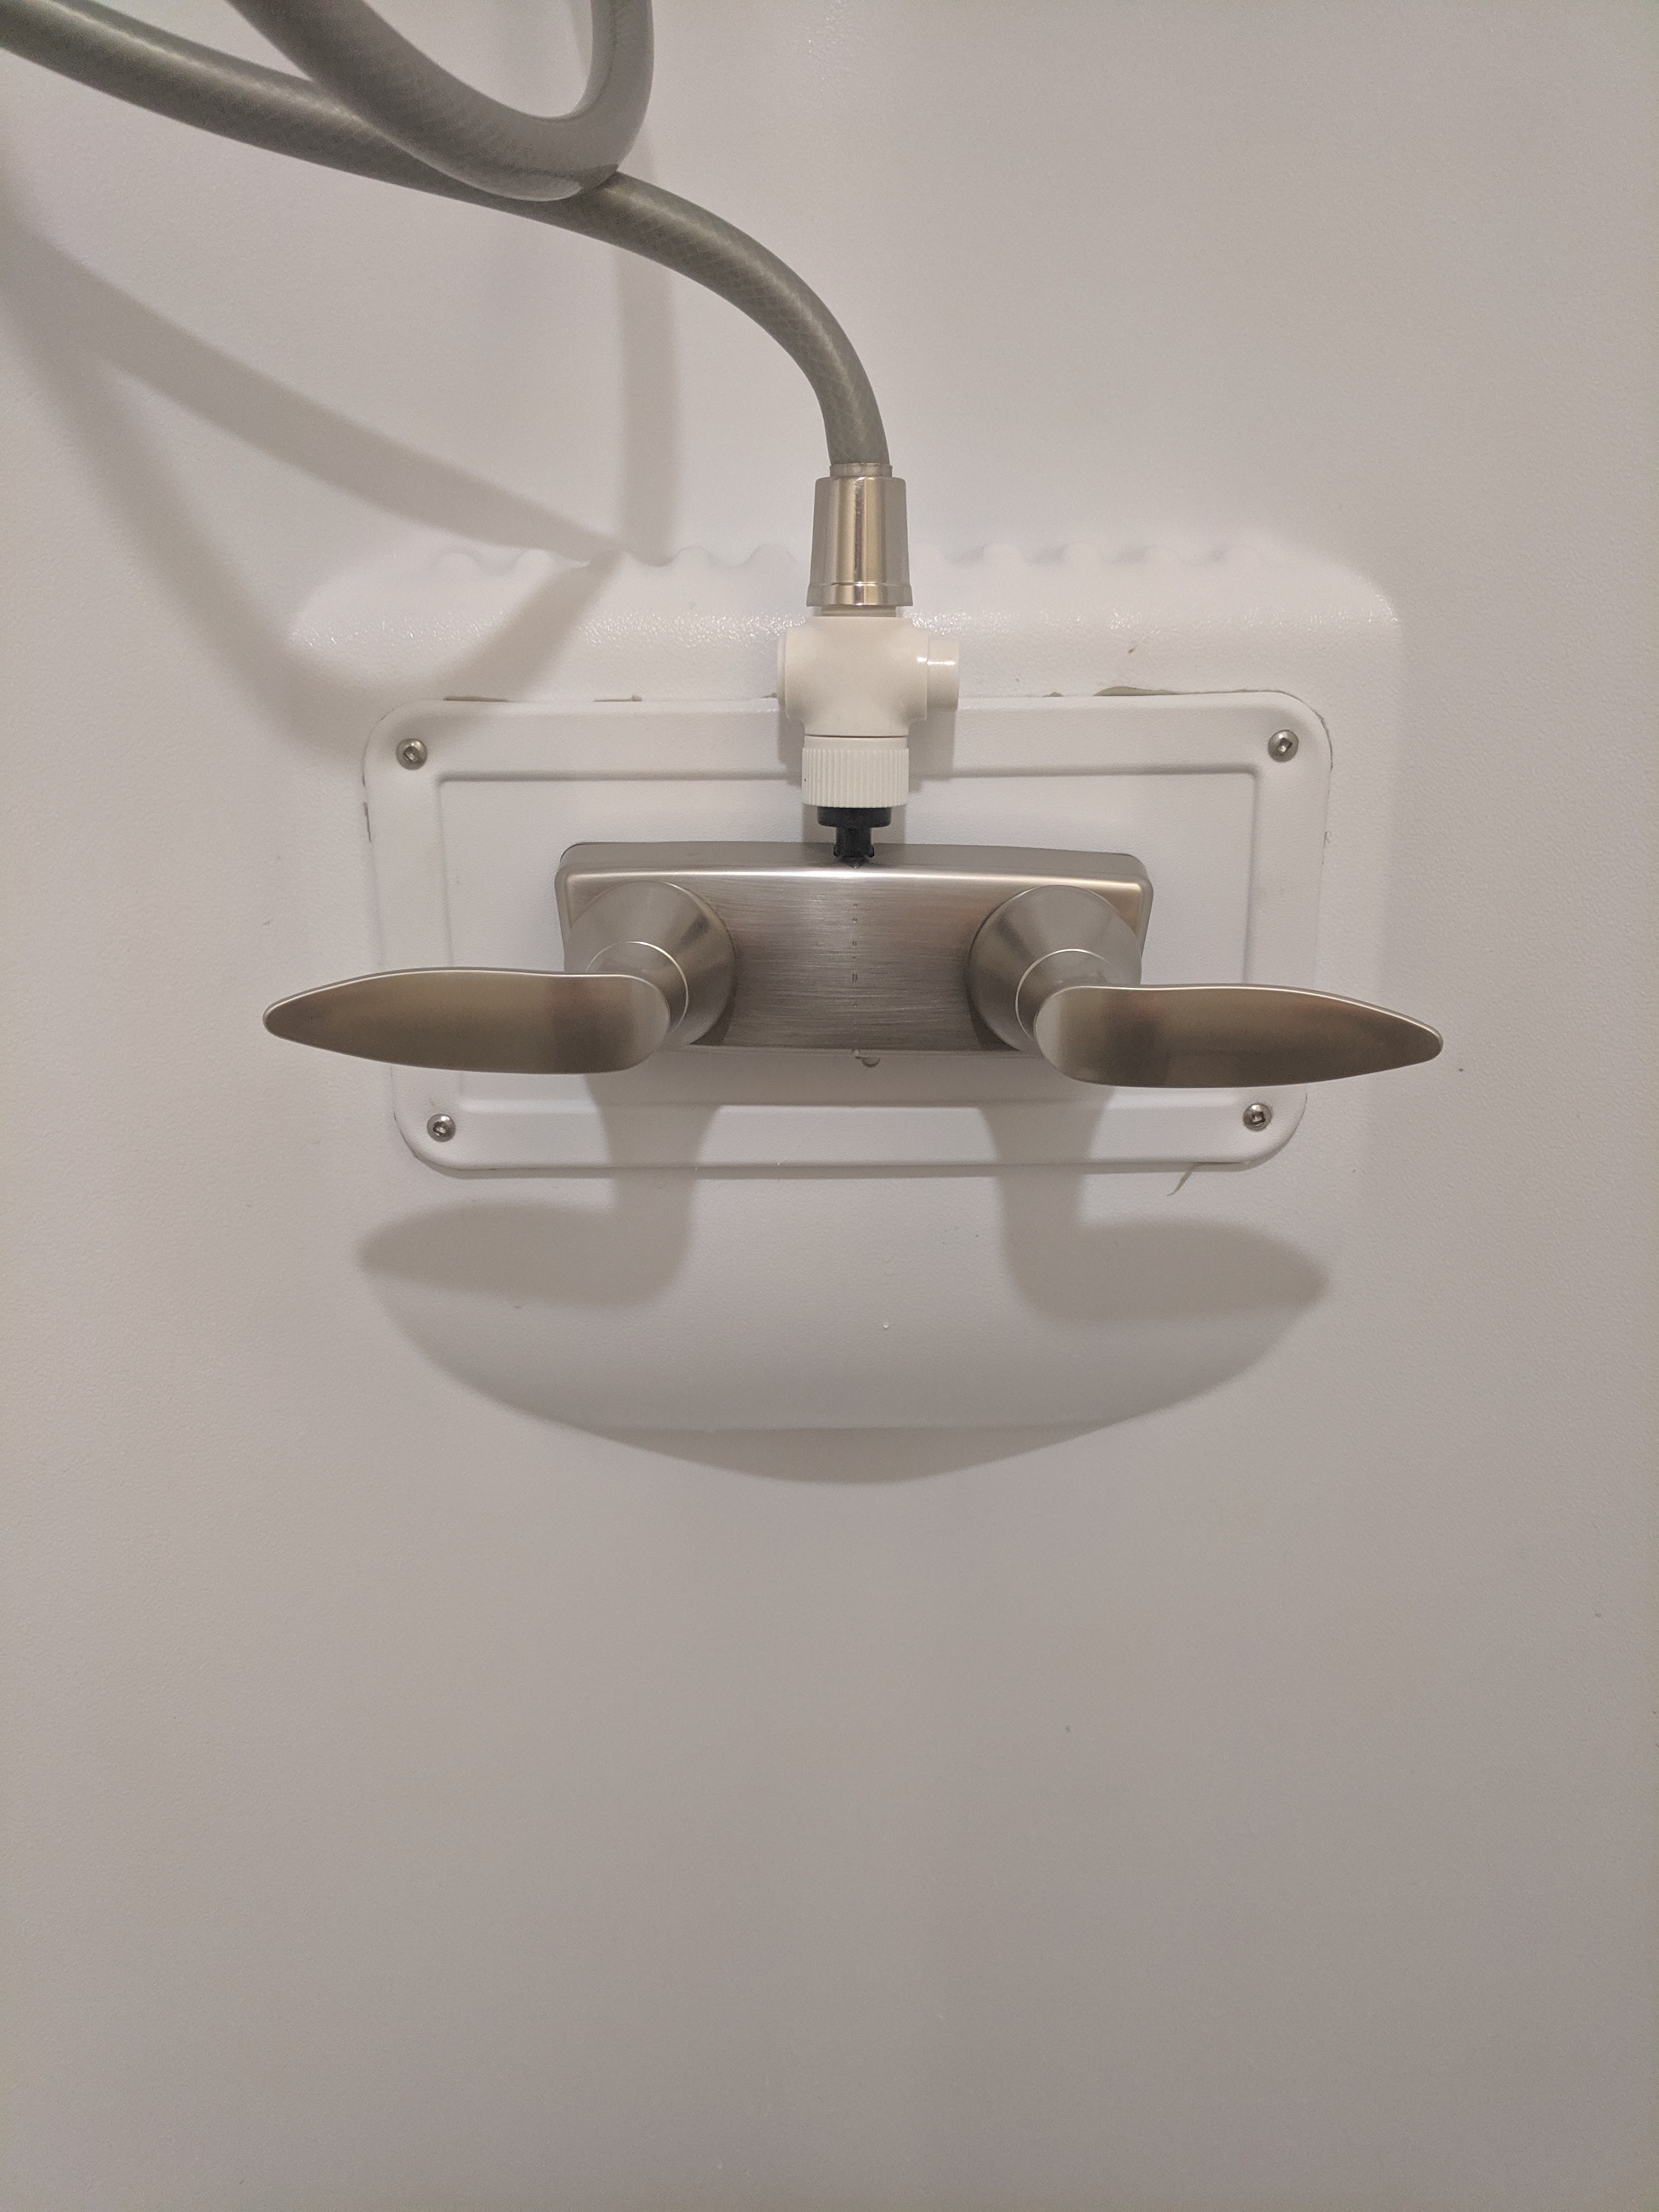
As we are counting down to our road trip to Missouri we have started getting our Lance Model 1995 travel trailer ready for the big trip. There was one maintenance item and one upgrade that I wanted to take care of today. Actually the maintenance item only cropped up today!
First the maintenance item. I brought our trailer home from the storage yard and back it into our driveway. Since California’s dust harvest is in full swing our trailer is just coated with the Central Valley’s finest Modesto series loam. I gave the trailer a good rinse and took a sponge mop to the roof to get the stubborn stuff up there. Afterwards I went to plug in the electrical cord from the trailer to the house. When I opened the electrical connector cover on the side of the trailer, the cover broke off. Ugh. While it won’t affect operation of the trailer’s electrical system, it does leave the electrical plug exposed to the elements. It needed to be replaced. I found an exact replacement (the cheapest model they sell) at a local RV sales lot. It only took about 10 minutes to replace. Even though the trailer is still under warranty I elected to do the work myself because if I had taken it back to the dealer it would probably be sitting there for weeks and wouldn’t be ready in time for our trip. Ten minutes and $40 was worth it to me.
Next the upgrade item. Our shower has a single handle control for the water. It is VERY touchy. There is very little adjustment available between BRRR COLD and OUCH HOT! We actually waste more water trying to adjust it to our comfort. After reading some posts on the Lance Owners of America forum I elected to replace the single handle control with dual controls. One other modification I made was to add a check valve on the hot water side of the controls. I call it a water diode. (Electrical types will recognize this immediately but for the rest of you, a diode only allows electrical current to flow one way) I added this check valve because there is a shutoff valve on the shower hose that allows you to instantly cut off water flow without having to turn the valves. However, when we did this I found that the cold water was backflowing into the hot water line back towards the hot water tank. This meant that when you opened the shutoff valve again you would get a blast of cold water until the hot water flowed back through the pipe and into the shower hose. UN-acceptable! The check valve will prevent water from flowing back down the hot water hose. I haven’t tried it yet but I’m sure it will solve the problem.
So far we are really enjoying our trailer and look forward to the trip. Look for more about that in an upcoming article.
So the last two weeks there has been little in the way of flying and a lot in the way of carburetor tuning. We’ve been tweaking jet needle settings and even replacing jet needles but the one change that seems to have worked wonders is repitching the prop. Six Chuter sent me two more sets of prop blocks to repitch my prop.
The blocks are basically triangular blocks of carbon fiber, similar in appears to a door stop – sort of shaped like a right triangle. The long edge is precisely set at a particular angle. You wedge the prop between two of these blocks and then place it in the propeller hub and that sets your blade angle.
The current spacers I have are set at 12 degrees. I tried the 11 degree blocks but that didn’t seem to make any difference. When I put the 10 degree blocks in I got much better RPMs and cooler temperatures, so much so that I put my original jet needle back in and back at it’s original setting. I’ll try a test flight on Saturday morning and we’ll see how it it works out.
I took the test flight I wrote about in the last article. I had moved the needle clip to the top-most position on the needle, effectively leaning the mixture. The resulted in PERFECT throttle response. However, it also resulted in much higher engine temperatures.
No bueno.
I spoke to the folks at Six Chuter again and they are going to send me a different needle for my carburetor. They are also going to send me some new pitch blocks for my propeller. They believe the prop may not be allowing the engine to turn as fast as it should. I’m only getting about 6100 RPM static. They believe it should be closer to 6500. I’ll be trying the new spacers which will allow the prop to spin faster. This will cause the engine to work less hard to spin the prop as well. I’ll do another test flight once the spacers come in. If the spacers don’t correct the heating problem then I’ll try the new carburetor jet needle.
Six Chuter has been very responsive and I appreciate the factory support I’m getting. Great company!
I have been having trouble with the throttle response of my P3. I called the factory support line and talked to their engine guru. He suggested that I run the P3 on the ground, throttle up until I get into the problematic RPM range, and then give it a little shot of prime. (The primer shoots gas directly into the carburetor and is generally used only during starting.) The thought was if I gave it some prime, and then engine bogged down, then I’m running too rich, if the engine revs up, then I’m running too lean with the stock settings in the carburetor. I tried the test and it bogged down big time.
Six Chuter factory support recommending I change the clip position on the jet needle. With out going into carburetor theory the jet needle controls how much gas the carburetor delivers to the engine. Moving the clip up makes the engine run leaner, moving it down makes the engine run richer. I moved it down first, and the problem became worse. I moved the clip up and throttle response was good throughout all RPM ranges!
I did have a momentary scare when I saw that there was a split in the clip on the jet needle. I had never noticed it before but was assured it was completely normal and was part of the design. Six Chuter factory support assured me this was normal. And a friend of mine who has an extensive ultralight history assured me this was normal. In fact, he sent me an article by Chris Wolf on rebuilding the Bing 54 carburetor which has this excerpt:
If you look closely at the E CLIP, you’ll see that it has a break in the
metal, right next to the curved part of the clip that snaps around the body
of the JET NEEDLE. This is as it should be. Rest assured that you didn’t
break the clip when you pulled the JET NEEDLE out of the piston.
Well that’s exactly what I did. I dropped the clip on the ground and thought I broke it! So glad Jim Volk sent me that article.
Now that I have the carb adjusted properly I’m going to give it a test fly tomorrow and see how it works. I’m hoping this cures the problem and I can start working on my landings again.
A Name
I’m not big on naming inanimate objects. I’m not good at it. However, when a fellow P3 pilot suggested that since I used to work right outside the gate to Moffett Field and I had P-3 Orion Sub Hunters flying overhead all day, and since I was working for the company that manufactured these airplanes, Lockheed, that I call my P3… Orion. And a name is born! This same fellow also quipped that I should check the belt drive on the propeller from time to time, as he put it, don’t for get to check Orion’s belt!
I’m a network administrator for a local county hospital. Every once in a while I like to video some of the glamorous things I get to do as a network administrator. Most of the time I’m proving that there is nothing wrong with the network. That is 99% of what I do. But every once in a while “the network” actually breaks. This is a short video of me fixing “the network.”
I didn’t specifically buy this truck to do any towing. It was literally going to be just a replacement vehicle for the minivan, which, was falling apart. Especially after seeing the abysmally low tow ratings for the RAM 1500 ST. Then I started researching light weight travel trailers and starting thinking “what if”? Then I found the Lance model 1985 travel trailer. It has a gross weight well under my truck’s max tow rating. However, I would need to add a brake controller.
I actually already had a brake controller I could have used but it’s the type that hangs down below the dash and you end up knocking your knees on it getting in and out of the truck. After doing some research I found it was possible to add the factory supplied brake controller. I used THIS DOCUMENT as my guide to installing the Ram Integrated Brake Module (RIBM) and everything went (almost) well.
When you order the RIBM, it comes with two bezels, one charcoal grey and the other tan. I used the grey bezel to match my panel obviously. It installs into the below space in your panel. Originally there was a small change holder here. It removes easily with two screws and the RIBM slides right into place. Ram supplies an extra screw to hold the RIBM in place. These are Torx 20 screws.
To get at the wiring you have to remove the kneeguard panel just below the steering wheel. This is super easy as well. You remove two screws at the bottom of the panel and it snaps out. Then just let it hang by it’s wiring.
Here is unfortunately where I stopped taking pictures. To complete the installation I had to tap into the pink wire in the upper right corner of the above photo. I then had to run this wire over to the brake controller. The reason I had to do this is because the RIBM comes with two connection ports. I had the first connector in my truck. This is the one that goes to the 7 way plug back at my tow hitch. The second connector supplies power and connects back to the truck’s EVIC or Electronic Vehicle Information Center. My truck didn’t come with an EVIC so they didn’t bother to put this second plug in. So at the other end of the wire I ran I installed a small female pin that fit the male pins on the second RIBM connector. (These connectors are available on Amazon.)
I crimped the pin onto the wire (make sure you use the proper crimpers for this or else use pliers and some solder.) I put some heat shrink over the end so the bare metal connector wouldn’t short against any of the other pins. To make sure the cable stayed on I used some super strong duct tape to tape the wire to the bottom of the RIBM.
I plugged the red wire into the smaller connector and then installed the RIBM into the panel. After it was secured I plugged the connector I found under my panel into the second larger connector on the RIBM. When I turned the key and saw that it powered on I put all the dashboard panels back into place.
I know that CF means controller fault and that’s because there is no trailer connected. What I don’t know yet is how long it flashes this message. I didn’t leave it powered on that long because it was starting to rain. I’ll do some more research today and see if I installed it correctly.
UPDATE:
The CF (Controller Fault) problem has been solved! When I first read about this installation many of the people who did this before me said that I only needed to hook up the +12V line on the second jack in the controller. This the the single wire I connected as discussed above. This was simply not true. I had to connect the CANBUS + and – lines as well. Even though I don’t have an EVIC, these lines are needed by the controller. Otherwise it thinks there is a problem. After I connected these pins per the document I referred to above, the controller functioned correctly! I have not connected a trailer to it yet so I don’t yet know completely if the RIBC is fully functional.
After measuring how much fuel primer line I would need I threaded it through the protective mesh webbing and added heat shrink tubing on both ends of the mesh.
Then I heated the tubing ends up in boiling water to help them stretch and slide over the fittings on the carburetor more easily. I secured the carburetor end of the primer line and then slide the primer bulb ends of the tubing and mesh through the hole in the Rodeo Nirvana backshell. I had to file out the hole a little because the primer tubing was slightly thicker walled than the orginal tubing. I added some Gorilla Glue and then propped the motor up so that the glue wouldn’t run. A little tape around the hole in the backshell prevented (most of) the glue from running out the hole.
After the glue dried I cut the tubes to length and pushed them onto the primer bulb fittings. I put a dab of superglue on the tube ends to make sure they stayed on the primer bulb. I did not glue the primer bulb to the backshell but just left it snapped in place. If no leaks develop then I’ll glue it in.
First of all it was a beautiful day here in California’s vast Central Valley. It was sunny and 100 degrees here a few days ago and this morning I woke up to 62 degrees and this…
It’s a great way to usher in Autumn. But I know that it will get hot again in a few days. I’m just enjoying the cool weather until then.
Fuel Primer – Part 2
My workaround has been working great but it’s not a permanent fix. I started on the permanent fix today. This required removing the engine from the trike, removing the fuel tank, removing the workaround primer, and removing the old primer line.
After removing the old primer line I salvaged the sleeving used to protect it and ran the new primer ine through it. I still need to get some heat shrink tubing to protect the ends of the sleeving and to secure the fuel lines inside it.
Tomorrow I’ll get the heat shrink tubing and hopefully finish off this repair.
The Rodeo engine (made by Nirvana) had it’s first maintenance issue this past Friday. It was just bad enough to ground me though a relatively easy fix. I say relatively because I have to take the entire trike apart to make the repair. The problem was my primer bulb. When I tried to prime the engine this past Friday I pulled back a very smelly and wet finger.
*Pauses to let laughter subside*
When I looked at my primer bulb it had developed a pinhole leak. If I tried to start the engine without priming a very fine stream of gasoline would come out of the bulb when the engine was turning. Not a good thing. So I grounded the machine until it could be repaired. And for those who don’t know what a primer bulb is… it’s a small pump basically. You press it with your thumb and it squirts fuel directly into the carb which helps the engine to start.
I said earlier that the repair is ‘relatively’ easy because the repair is a simple matter of replacing a $2.00 primer bulb. It snaps out and back in. The ‘relatively’ part comes into play when you’re trying to gain access to the primer bulb. To get it out you basically have to take the entire machine apart.
First I had to remove the propeller, the propeller cage, and the seat and harness.
Then I had to remove the engine from the trike and dump the fuel back into the gas can. Most of it made it back into the can. After I had the engine up on the workbench I had to carefully remove the fuel tank. This is kind of difficult with one person but can be done with patience. Note that the gas cap was removed when I removed the tank, I put it back on to keep contaminents out of th tank.
With the tank removed I could then get at the back side of the primer bulb. I removed the fuel lines from the primer and labeled them so the would go back on in the correct positions. On the carb end I labeld them L and R for left and right. On the primer end I labeled them S and L for short and long which correspond to the fittings the fuel line was removed from. One is short, one is long.
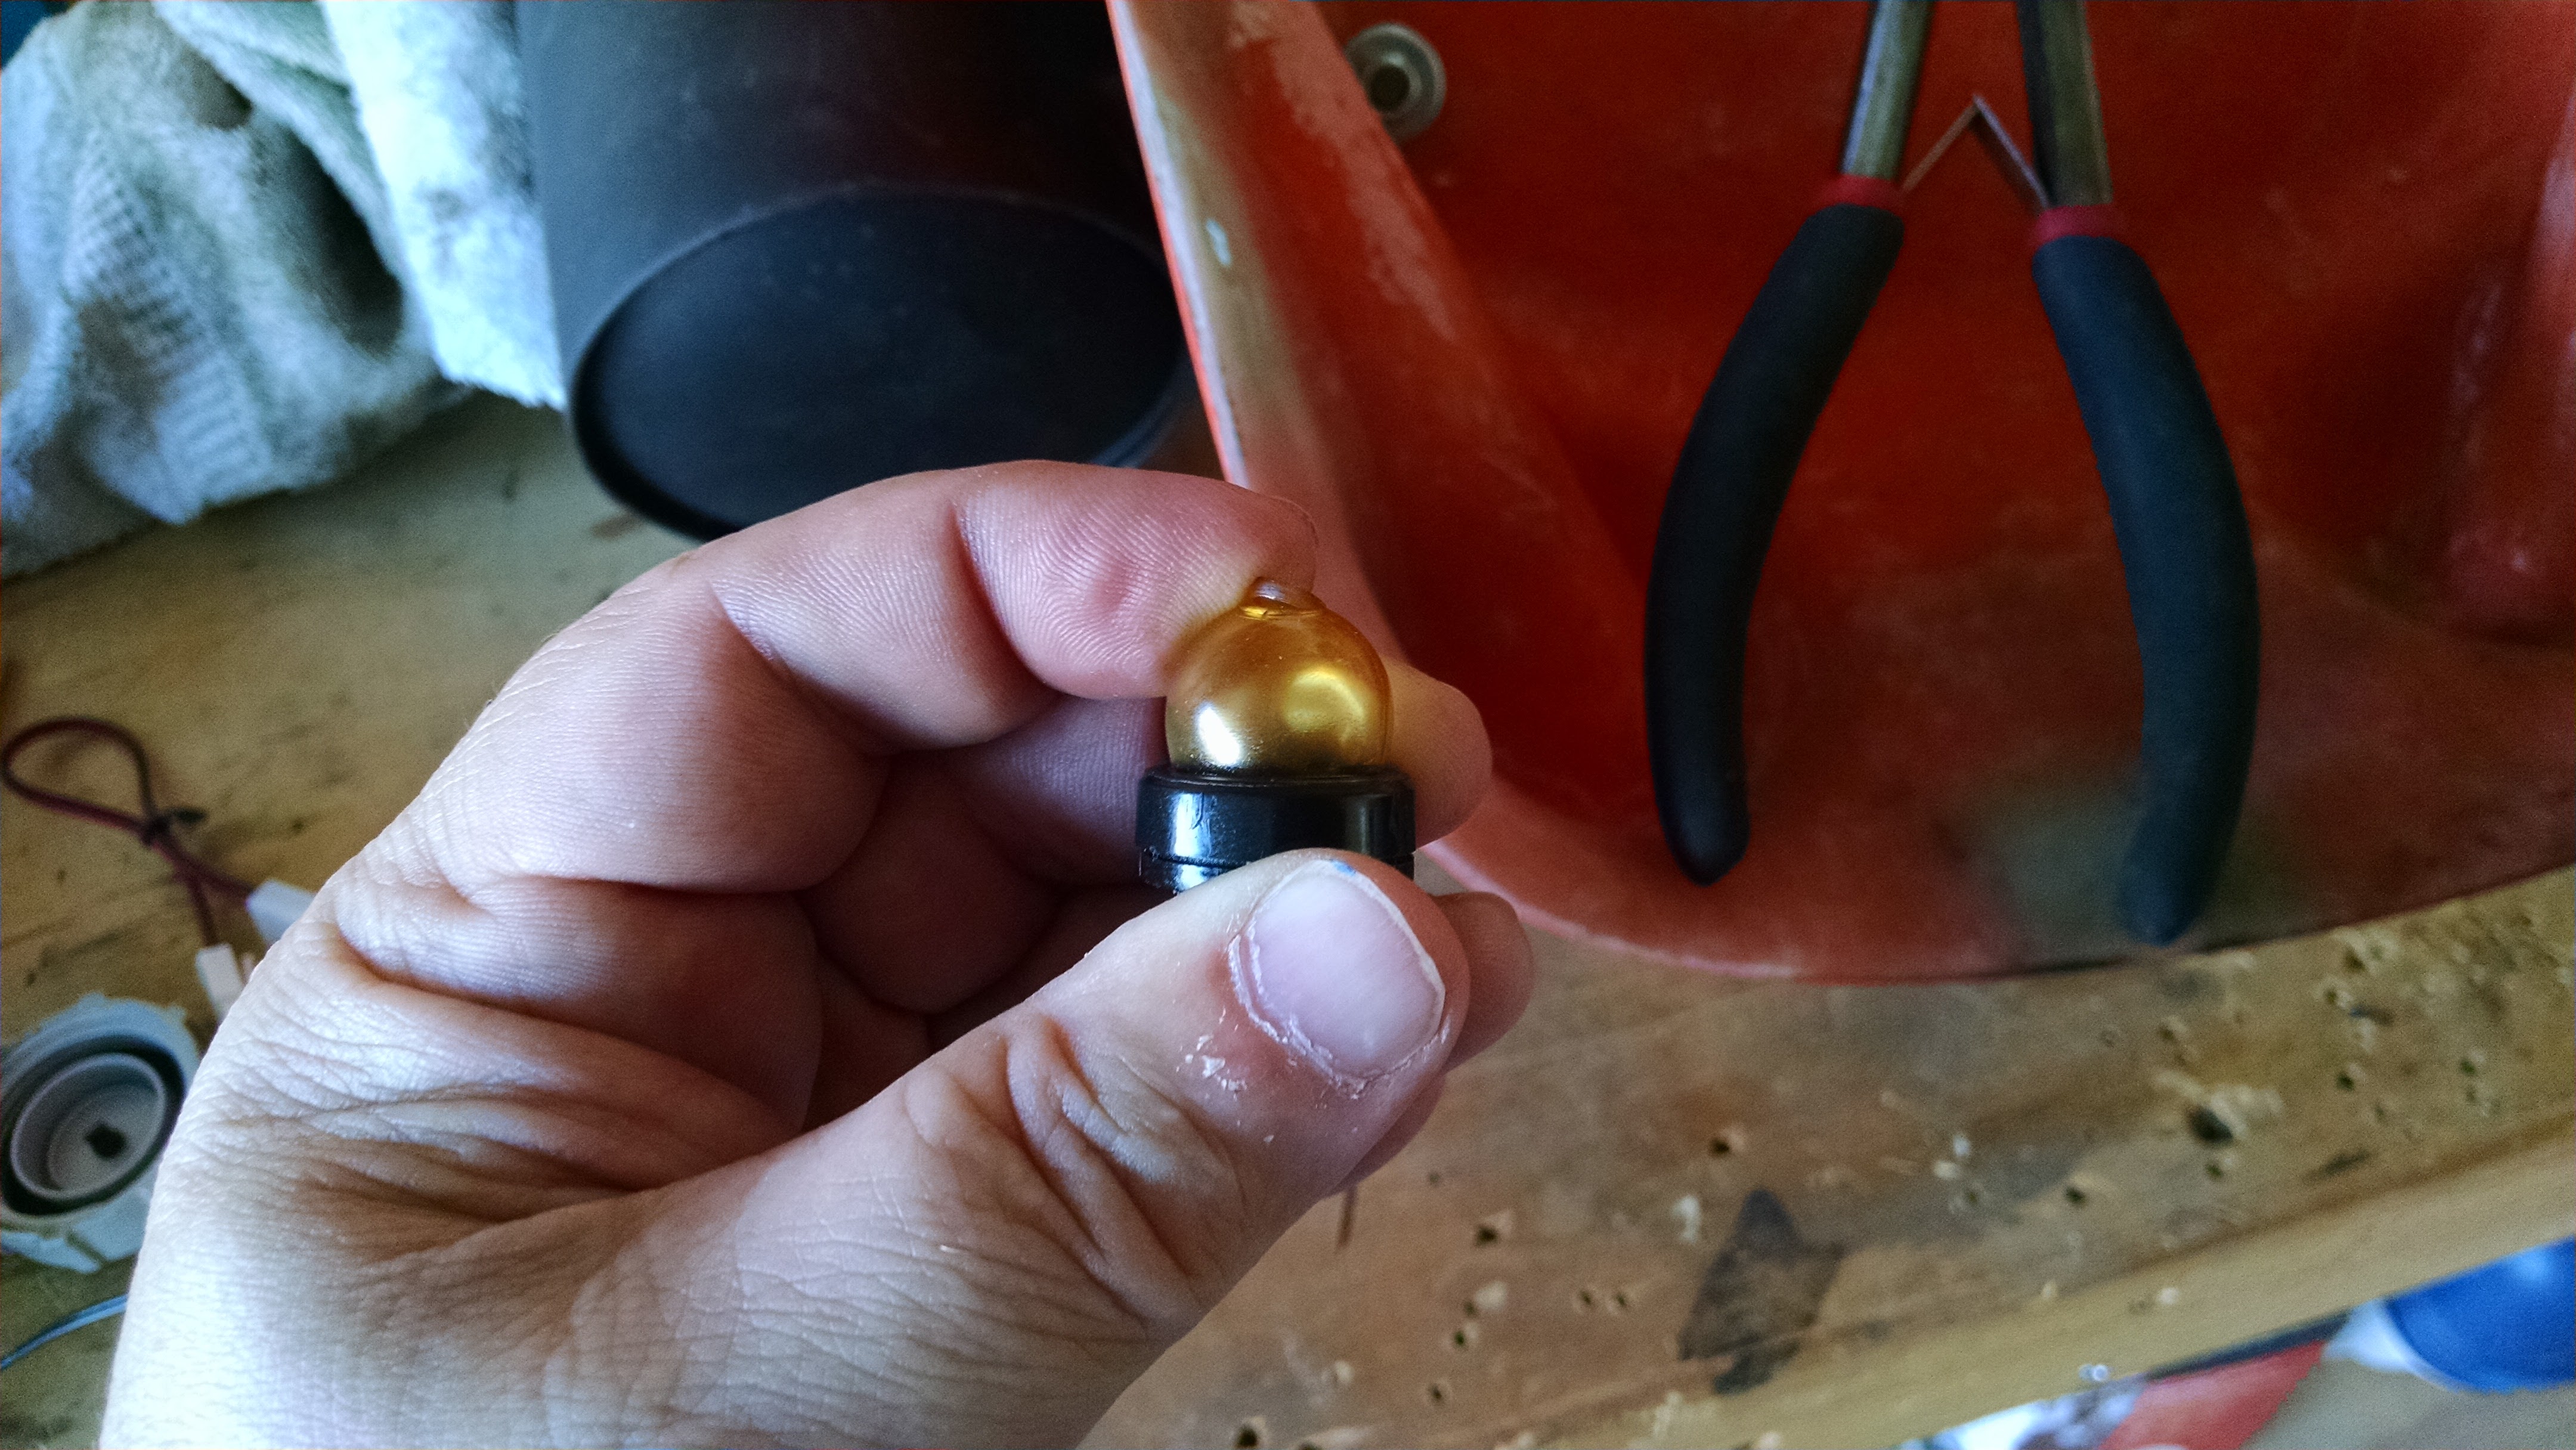
After that it was a simple matter of squeezing the locking pins together and popping the bulb out.
Once I had the bulb out I could see that the pinhole had quickly become a bigger hole just with vibration and a little bit of manhandling which it got when I removed it. It’s hard to see but the entire middle of the bulb is about to come off.
Apparently this is a fairly common part on chainsaws and similar small engine equipment. I found a box of 5 on Amazon for about $6.00 and it will arrive on Tuesday. I’ll post an update when I put it all back together.