More RV-4 work, more RV-7 work

I worked some more on my RV-4 elevator. I spent most of the day getting very little accomplished on it. It’s almost ready to rivet. I need to get some smaller nails for the close quarter dimpler I have. You use a pop rivet tool, some dies, and a nail to dimple a rivet hole. Once these last few holes are dimpled it’s ready to start riveting the elevator spar to the skin.

I also did some work on my RV-7 horizontal stabilizer skeleton. I alodined the ribs and spars and other raw aluminum stock that goes on there. I have found that the best method when using alodine is to just pour it in a basin and soak the pieces in it. I tried a trick using a long plastic bag to alodine the longer parts but had mixed results. When it comes time to alodine the vertical pieces I may look at a different technique. Here are some pictures of the final product. You can see I need to refine my technique. It’s good enough though and won’t be seen by the general public anyway.

Forward side

IMG_1478_small.JPG

Aft side

IMG_1480_small.JPG

Left hand elevator almost done

The bulk of the work on the left hand elevator is now done. All I have to do is add a little more lead to the counterweight and then attach the fiberglass end tip.

elevator1.JPG

I was a little intimidated by the lead counterweight but it turned out to be fairly easy. What I ended up doing was lining the counter balance ribs with aluminum foil as a form for the molten lead. I bought a couple 2lb lead fishing weights from a local bait shop. I then melted them down in a stainless steel measuring cup and poured the lead into the ribs and let it cool in place. I’ll need to repour it though because I have to put a nut and bolt to hold the the weight in place. Having already done it once it won’t be to intimidating next week when I finish up.

elevator2.JPG

Below is a picture of the rod end bearing cut out on the front of the elevator. An acquaintance on an internet form I belong to thought it looked a little chewd up. Hopefully it looks better now.

elevator3.JPG

Elevator repairs coming along

For those of you who have been keeping track, some cracking was discovered on my left-hand elevator trailing edge.  This was a fairly common problem with the early RV-4 kits.  After consulting with the aircraft kit manufacturor, I decided upon rebuilding the elevator with thicker skins. 

At this point I am now almost done with the left hand elevator.  I just finished mounting the elevator bearings which took some uncharactaristically careful measuring and cutting on my part.  In the photos you can see the bearings and the horizontal stabilizer hinges I had to match the bearings up with.

IMG_1463-b.JPG
Here are the holes with the platenuts already revited on

IMG_1468-b.JPG
Here’s the bearing installed in the nutplate, also shown is the jam nut

IMG_1465-b.JPG
Here are the hinge fittings that I had to carefully match the bearings up with.  Normally when building the entire empanage you would not drill the final positions of these fittings until you had matched them up with the bearings.  I didn’t have that luxury but it still turned out pretty well.  I had to oblong one hole a little but you it doesn’t affect anything, the nutplate provides all the strength.

Fresno, CA (KFCH)

kfch.jpg

Flew into Fresno Chandler Downtown Airport today. I had some work to do down at the Fresno Bee. The work was okay but the commute was great!

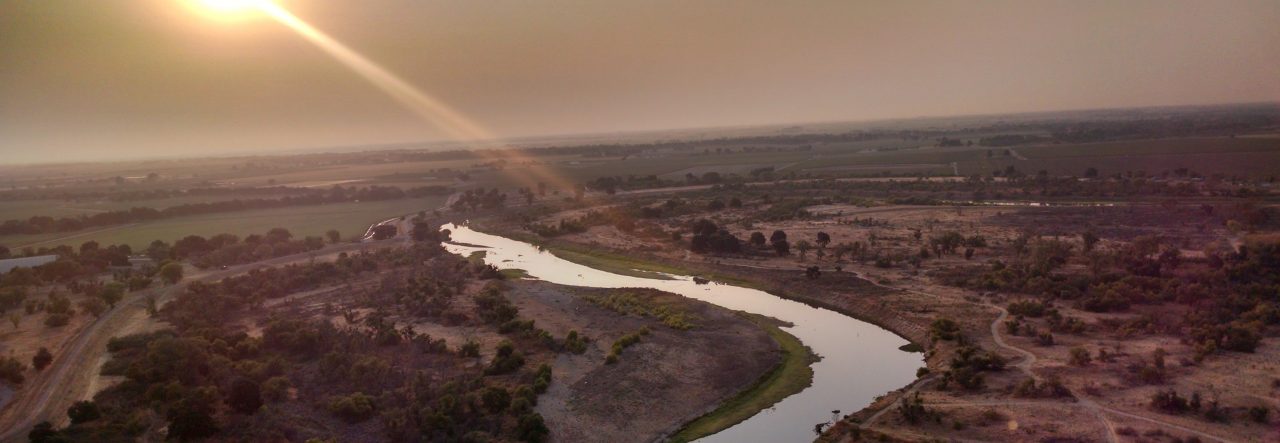
The air was cool and still this morning when I took off from Oakdale, CA (O27) at 9am this morning. I levelled off at 3000 MSL to enjoy the sights. The trip took about 35 minutes from take-off to landing, 45 minutes from engine start to engine shutdown. Considering it would normally take me about an hour and a half to drive there, that’s not bad.

One of my counterparts down at The Fresno Bee came out to the airport to pick me up and was very understanding about me being a little late. He hung around and waited even though they were having system problems back at work. Whatta’ guy!

He also related seeing a gyrocopter accident just before I landed. I heard Unicom announce that 30R was closed when I was on downwind. Not a big deal since I was headed in to 30L. Thank goodness they didn’t close the whole airport down like some communities would! My co-worker related that the gyrocopter was starting his take-off run but wasn’t getting into the air very well. He set back down on the runway a couple of times. The last time he set down it appeared like he had drifted off the runway because as soon as he touched down he started cartwheeling. The pilot got out and was walking around so we assumed he was okay. But probably very unhappy.

We drove down to the Bee where I spent most of the day down in the basement working on the server I was assigned to rebuild and eventually got it working well enough so that they could limp along through to the next day. After some mandatory visiting and shop talk I was driven back to Fresno Chandler Airport.

I packed my laptop and my CD collection up in the back seat and strapped in. It took about 45 minutes in the air to get back to Oakdale because of the afternoon Delta Breezes. Usually about 10 – 15 mph from the northwest. Just the direction I had to go, great. I climbed up to 4500 MSL for the trip home and found calm air again. There was very little headwind at this altitude so I levelled off and headed for home.

I got back to Oakdale and it felt hotter there than in Fresno! That is just wierd. But I made a decent landing, not great but good. I was glad no one was around. 🙂 When I got back to my hangar I shut the plane down, opened the canopy, and just sat and listened to the ticking of the engine cooling. I always pause for a few minutes after flying to just sit in the plane and express my gratitude to the Lord as He has seen fit to allow me to engage in such a wonderful passtime!

What a great commute I had!

If your interested in the trip I just took, here is the TripTick I created on AeroPlanner: Fresno 2-Aug-06 0929.pdf

Paso Robles, CA (KPRB)


KPRB


Lunch at Paso Robles

A few weeks ago some friends and I decided to fly to Paso Robles for lunch.  Dennis and his son Chris flew in Dennis’ RV-6A and I flew along in my RV-4.  The trip of about 145 miles took us just under an hour from wheels up to wheels down on the ground.

We taxied up to the transient parking that was just in font of Matthew’s at the Airport and secured our aircraft.  We could have parked closer except for the two ANG C-130’s parked directly in front of the restaraunt.  They were loading a bunch of young men who looked as though they were going camping or something; lots of back packs and boxes.  They had parachutes too.  I wonder what they were going to do with them?

Dennis, Chris, and I enjoyed watching the military display in front of us while we waited for our food.  Soon the C-130’s were gone and we were left to a peaceful lunch.  The food there is definately as good as other patrons of Matthew’s have stated.  After a leisurely lunch we hopped back in our planes and started to head back toward Oakdale.  We had to wait for the returning C-130’s to taxi past us.  I wonder where all the guys in the back went?

It was late afternoon and getting a little bumpy over the hills so I took the short route to the valley via Coalinga while Dennis flew directly back so he could stop for fuel at Gustine.   I headed toward the Sierra Nevada foothills and did a little sight seeing on the way back.  Dennis and I arrived back at Oakdale at almost the same time.

If you ever find yourself hungry and you’re near Paso Robles, be sure to stop in at Matthews!  Great place!

Crack pictures

I’ve been asked by several people for pictures of the cracking I’m experiencing.  I’ve not been able to get any good pictures of the elevator cracks but I did manage to get pictures of the wing skin cracking.  Here is a pic of those cracks.

Wing skin cracks

More to do, more to do

I can’t stand the fact that those cracks are there on my wing.  I also can’t afford to paint the plane and am planning to polish it.  I can’t polish it with those cracks staring me in the face!!  So, here’s the new plan:

  1. Finish the annual
  2. Fly the plane a little to get it out of my system
  3. Build the new elevators as I have time
  4. When the flying is out of my system, begin drilling out ALL the rivets on the inboard top wing panel and replace that skin.
  5. Polish the entire aircraft

Yes, I’m crazy but I just really can’t stand keeping the plane with those cracks in the wings.  I’m going to hate polishing the plane but I’ll have to do that myself too.  Okay, last plan.  I promise.

What to do, what to do?

I’ve finally come up with a plan for my cracks. The factory which makes the kit ( Van’s Aircraft ) has said that I can stop drill the cracks and just watch to make sure they don’t spread (which they are not expecting to happen.) I’ve had other advice that I should remove the wing and drill that whole skin off and put a new skin on. The most sensable advice came from a friend who built a similar airplane. Aside from being a Godly man in his own right, he is a retired materials engineer. He agreed that the cracks on the wing skin didn’t pose any hazard to flight but that if it were him he just couldn’t stand looking at them. So I’m going to follow his advice which involves drilling out the rivets in the affected area from the fuel tank all the way back to the trailing spar. Then place a doubler skin on top of this that will cover the entire wing in the affected area. This will do two things; hide the cracks, and provide extra support for errant feet. Once painted over it will look like it was designed that way.

As for the cracks on the trailing edge of the elevator, well, I’m just going to rebuild both elevators. I’m looking at this as an opportunity to replace my manual trim system with electric trim. Just got to get this bird into painting shape!

Follow up to skin cracks

Just got an email from the factory regarding some cracking in my wing skins.  The official word is no problemo.  I can just stop drill the cracks (making sure not to drill into the spar.)  I’ll have to ream out the elongated hole on my landing gear leg but it’s not critical at this point.  Big sigh of relief.

More Cracks!

Drawing of cracking locations

Oh boy, talk about your crack pot! As I was giving rides to some church kids I noticed some more cracks on my plane. These were on the wing just outboard of the wing walk (where passengers step on the wing.) Not sure really what to do about this one. I’ve got an email in to the factory about this. I’ll enter an update once they advise me.